Design and print specs
9x12 postcard template and specs
Free Canva templates with the spot grid already laid out — plus the exact dimensions, bleed, safe zone and indicia placement for a 9x12 EDDM community card, and the mistakes that cost a reprint.
By Dustin Myers · Sources and corrections
Last updated
Free Canva templates
Open a card and start designing
Each one is a whole community card, already laid out — ad spots on a grid, header, indicia block and the postal panel in the right places. Open it, hit Use template, and replace the placeholder spots with your advertisers. Free, and you keep the copy.
6×11
11 × 6 in · Landscape
The cheapest way to run a first card. Fewer spots, lower print and postage.
Open the 6×11 template6.5×12
12 × 6.5 in · Landscape
A longer card with room for one more row of spots than a 6×11.
Open the 6.5×12 template9×12 horizontal
12 × 9 in · Landscape
The standard community card. The most spots that stay legible at print size.
Open the 9×12 horizontal template9×12 vertical
9 × 12 in · Portrait
Same area, taller grid. Reads differently in a mailbox and suits some layouts better.
Open the 9×12 vertical template
Starting from a blank Canva document instead?
- Choose Custom size, switch the units to inches, and type the finished card size from the format you want above — not that size plus bleed.
- File → Settings → Add guides, with a margin of 0.25 in on all four sides.
- Keep every phone number, logo and offer inside those guides, and let background photos run past them to the document edge. The cut is never exactly where you expect.
- Share → Download → PDF Print, with crop marks and bleed switched on. Canva adds the bleed for you, which is why you built at the finished size rather than adding to it.
Handing the job to a designer or a print shop instead? Print-ready guide files are further down.
A 9x12 community card is a print job with unforgiving constraints: it has to trim cleanly, it has to satisfy USPS EDDM requirements, and it has to carry ten to sixteen advertisements that are all still legible after printing.
Here are the specifications, then the layout decisions that matter.
Exact dimensions
| Measurement | Value |
|---|---|
| Trim size | 9″ × 12″ |
| Orientation (community cards) | Landscape — 12″ wide × 9″ tall |
| Canva document size | 12″ × 9″ — the trim size |
| Bleed | 0.125″ on all four edges, added by Canva on export |
| Print file size with bleed | 12.25″ × 9.25″ |
| Safe zone inset from trim | 0.25″ |
| Live area | 11.5″ × 8.5″ |
| Resolution | 300 DPI at final size |
| Color mode | CMYK |
Build at 12 × 9 and keep everything that must not be cut inside 11.5 × 8.5. Every reprint anyone has ever paid for in this business is because a phone number sat outside the safe zone and the trim took the last two digits.
The 12.25 × 9.25 figure is what the finished print file measures once bleed is included. It is not what you type into Canva — Canva adds that margin itself at export, so building at 12.25 × 9.25 gets you a card a quarter-inch too big.
Cardstock and finish
14pt coated cover is the standard. It survives the mail stream, it is what most EDDM printers quote by default, and it is the cheapest option that does not feel cheap.
16pt costs modestly more per piece and is noticeably more substantial in the hand. If you are selling anchor spots at $900+, the upgrade pays for itself in how the card presents when you are holding it in a sales conversation.
Gloss vs matte: gloss makes photography pop and is the default. Matte or soft-touch reads as more premium but suppresses color saturation, which advertisers with bright logos will notice. UV coating on one side only is a common compromise.
The EDDM requirements
The address side must carry:
- The EDDM indicia in the upper right
- The ECRWSS endorsement
- A clear address block area — for EDDM this is where the “Local Postal Customer” line goes
EDDM Retail does not require a mailing permit. Use the free Retail indicia provided in the USPS EDDM guide. If your printer is mailing under its own permit instead, use the indicia artwork it supplies for that mailing service.
For the size rules themselves, verify against current USPS specifications before you commit a run. EDDM’s flat-size limits are the entire reason this format is economical, and they are the one thing you cannot design around.
Laying out the ad spots
This is where most templates fall down, because a template gives you a grid and the grid is not the hard part — legibility at print size is.
How many spots
Ten to sixteen. Below ten and each spot has to be priced past what a small local business will pay without a long conversation. Above sixteen and the small spots stop being readable, which is how you lose renewals — an advertiser whose ad nobody could read does not buy again.
A grid that works
A 12″ × 9″ face divides comfortably into a 4 × 3 arrangement of roughly 2.75″ × 2.75″ cells, with the live area giving you a bit under that. From those twelve cells you build mixed sizes:
| Spot | Cells | Approx printed size | Typical price |
|---|---|---|---|
| Anchor / mega | 2 × 2 | 5.5″ × 5.5″ | $900 – $1,500 |
| Large | 2 × 1 | 5.5″ × 2.75″ | $700 – $900 |
| Medium | 1 × 1 | 2.75″ × 2.75″ | $400 – $600 |
| Small | half cell | 2.75″ × 1.35″ | $200 – $350 |
Minimum type sizes
Non-negotiable, because these are the sizes at which a reader in their fifties standing at a mailbox can actually read an ad:
- Business name: 18pt minimum
- Offer / headline: 14pt minimum
- Phone number: 14pt minimum, and never reversed out of a photo
- Body and disclaimers: 8pt absolute floor
If an advertiser’s artwork does not clear these, fix it before it prints. It is your card that looks bad, not theirs.
Leave room for tracking
Every spot should have space for a distinct phone number, a QR code, or a coupon code. This is the single highest-value square inch on the card, because it is what tells the advertiser the card worked, and that is what makes them renew. Design it in from the start rather than squeezing it in later.
Building the card in Canva
The templates at the top of this page already have the document size, the guides and the spot grid in place. If you are building from a blank document instead, the sizes and the four setup steps are in that same block.
Either way, two decisions are yours:
- Build the spot grid as locked rectangles so an advertiser’s artwork drops into a fixed box rather than resizing the layout.
- Design the address side second, with the indicia and address block clear.
Canva will produce a perfectly good print file. What it cannot do is know that square 4 costs $500, that it sold on Tuesday, and that the price on the card and the price the advertiser paid have to be the same number — which is the actual operational problem in this business.
The five mistakes that cost a reprint
- Content outside the safe zone. Phone numbers and logos clipped at trim.
- RGB artwork from an advertiser. Bright RGB blues and greens shift dramatically in CMYK. Convert and check before you send the file.
- Low-resolution logos. A 72 DPI logo pulled off a website looks fine on screen and pixelated at 9x12. Ask for vector or 300 DPI.
- Wrong quantity. EDDM means every address on the route. Your print count is the sum of the household counts, not a round number.
- A price on the card that does not match what was charged. Not a print error, but it is the one that costs you the advertiser.
Print-ready guide files
Only if you are handing this to a designer or a print shop. If you are building it yourself in Canva, the sizes above are all you need — skip this.
Each file is the print size with the trim line, the safe area, and crop marks already in place — bleed included in the file rather than added at export.
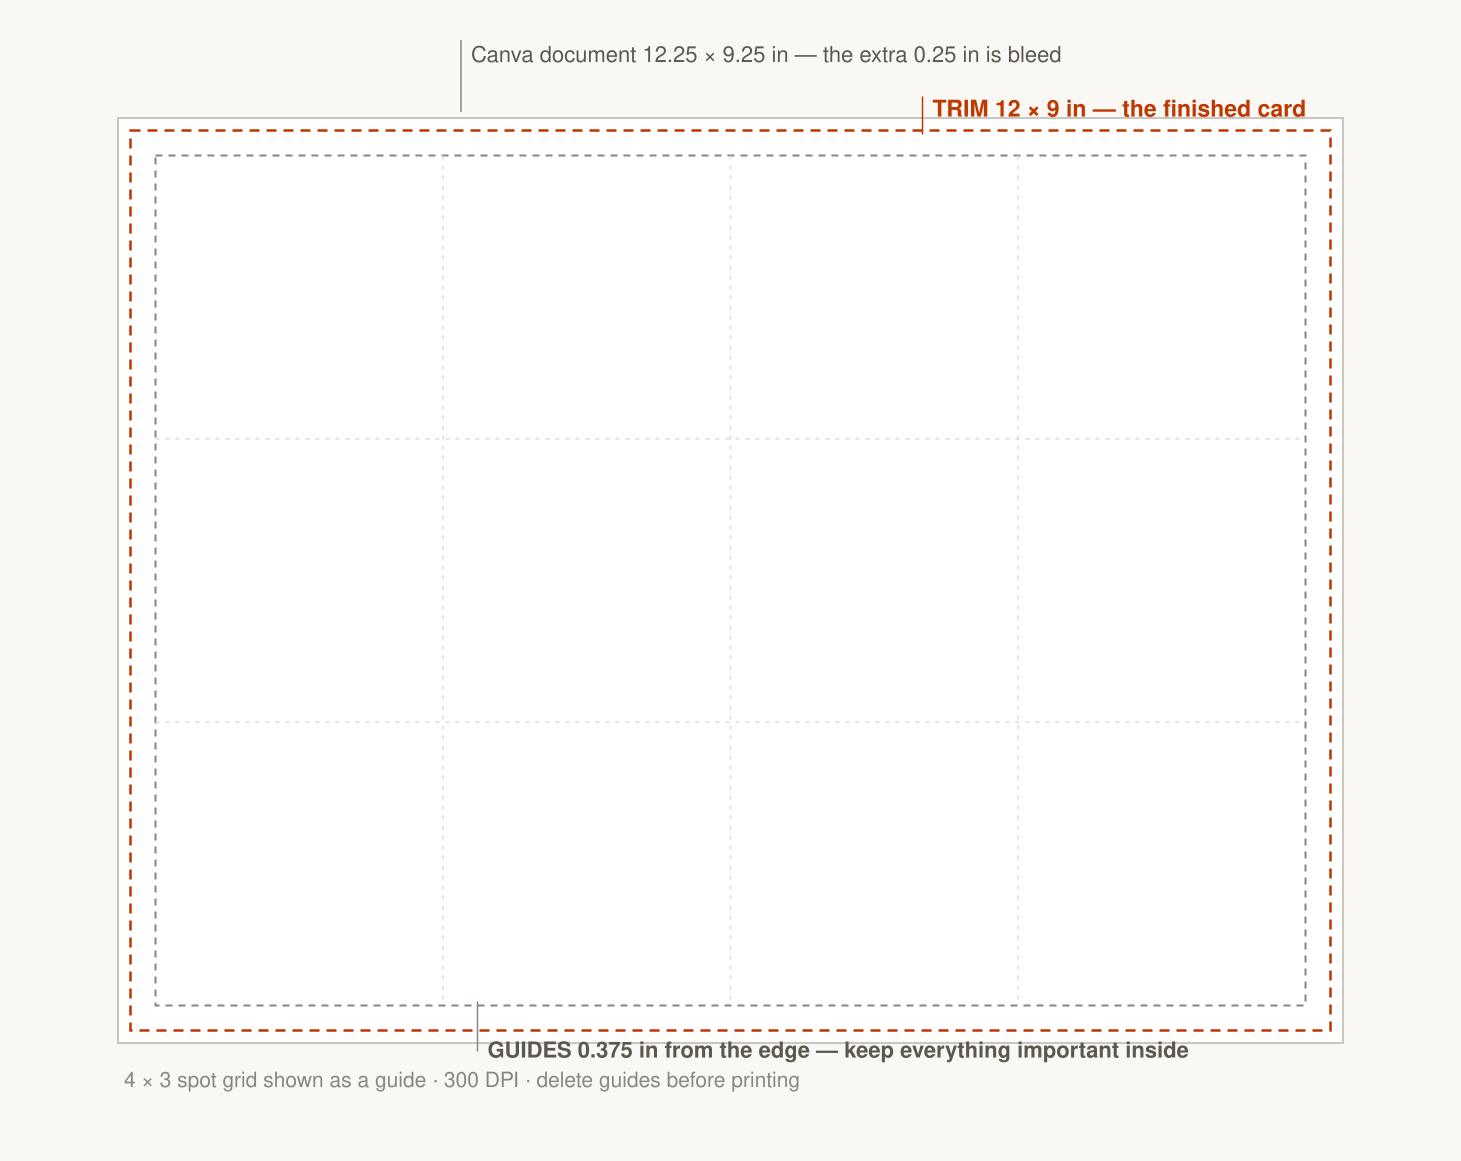
Three boundaries. The outer edge is the page including bleed, the orange line is where the card gets cut, and anything outside the inner guides can be trimmed off.
After the template
The file above solves the print geometry. It does not solve the part that comes after: one file for the layout, another place for prices, a third for who has paid.
The card builder here handles all five formats — 6×11, 6.5×12, 9×12 landscape and vertical, 8.5×11 — with bleed and safe zones locked, drops each advertiser’s finished artwork into their square, and keeps the price on the card and the price in the checkout as the same number, because they are the same number.
Straight answers
Before you ask.
Still not covered? Ask directly and you will get a reply from a person who runs these campaigns.
What is the exact size of a 9x12 postcard?
The trim size is 9 inches by 12 inches — the finished card after it is cut. All critical content should stay inside a safe zone 0.25 inches in from the trim, giving a live area of 8.5 by 11.5 inches. A print file adds 0.125 inch of bleed on every edge, making it 9.25 by 12.25 inches, but in Canva you build at 9 by 12 and let the export add the bleed.
Is a 9x12 postcard landscape or portrait?
For community cards it is almost always landscape — 12 inches wide by 9 inches tall — because a landscape grid fits more legible ad spots and reads better face-up in a mailbox. Portrait 9x12 exists and is used for single-advertiser mailers.
Does 9x12 qualify for EDDM?
Yes, as a flat. A 9x12 piece is within USPS EDDM Retail flat-size limits, which is what keeps the per-piece postage low enough for the shared-card model to work. Check current USPS specifications before committing a print run — the limits are the thing that makes or breaks the economics.
What cardstock should I use?
14pt or 16pt coated cover is the common choice. 14pt is the value option and holds up fine through the mail stream; 16pt feels substantially more premium in the hand, costs modestly more, and is worth it if you are charging anchor prices.
Where does the EDDM indicia go?
In the upper right of the address side, with the required 'ECRWSS' endorsement and the address block area kept clear. For EDDM Retail, use the free USPS Retail indicia; no mailing permit is required. If your printer is mailing under its own permit, use the artwork it supplies.
Can I design a 9x12 postcard in Canva?
Yes, and there are free templates on this page with the spot grid already built. Starting from scratch, make the document the finished card size — 12 by 9 inches for a landscape community card — and add guides 0.25 inches in from every edge. Do not add bleed to the document size: Canva adds bleed itself when you export as PDF Print with crop marks and bleed switched on. The limitation is not Canva's rendering, it is that Canva has no concept of an ad spot, so pricing and sold state live somewhere else.
The sizes are yours. Building and selling the card is the rest of it.
Five formats, bleed and safe zones locked, each advertiser's artwork dropped into their square — free to build.